Category Archives: Kubernetes

YAKB: Running Kubernetes on Your Laptop

Hi there! Yes, it’s been a while since I have posted to my personal blog. Before I get to my post, I thought I would just bring you up to speed with what’s been going on in my world since my last post. So I no longer work at Dell EMC. I also no longer work at Dell Technologies. After transfer upon transfer, I currently work at VMware. The change has been going good so far especially moving from companies that are traditionally hardware based to a company that is mostly software focused. While I have only been at VMware since March of this year, the momentum in the Kubernetes and CNCF communities and VMware’s commitment to those communities has made VMware an obvious choice going forward. Which leads me to this blog post…

Let’s get to the Blog!

So I am writing this “Yet Another Kubernetes Blog” post because I needed to document how someone can run Kubernetes on their laptop so that fellow future session attendees can follow along with future presentations that I might give. If this never gets used in one of my presentations, that’s cool… but I thought, hey why not just put this out here so that others might benefit from this. You could potentially use this blog post to just test drive Kubernetes and play around with its functionality.

NOTE: If you are running on Windows, well you might want to install something like VMware Workstation Pro so that you can get a RHEL7 VM running on your laptop. I believe you can try it for 30 days.

Installing Virtual Box

To simplify the installation among the two platforms, we are going to need to install Virtual Box (5.2 is recommended). To do that visit the Virtual Box Homepage, then download the installation package based on your platform.

On MAC, just download the DMG file and install Virtual Box like any other application on your MAC.

On RHEL7, download the appropriate RPM and then install using the following command:

sudo rpm -ivh 

Installing kubectl

Next, we need to install kubectl which is the Kubernetes command line tool to manage a Kubernetes cluster. You will be using this utility for the majority (if not all) of the operations to view what’s going on in your cluster to kicking off applications in your cluster. Fortunately, installation of this component is pretty straightforward.

On MAC, you can run the following command:

curl -LO https://storage.googleapis.com/kubernetes-release/release/$(curl -s https://storage.googleapis.com/kubernetes-release/release/stable.txt)/bin/darwin/amd64/kubectl && chmod +x kubectl && sudo mv kubectl /usr/local/bin/

On RHEL7, you can run the following command:

curl -LO https://storage.googleapis.com/kubernetes-release/release/$(curl -s https://storage.googleapis.com/kubernetes-release/release/stable.txt)/bin/linux/amd64/kubectl && chmod +x kubectl && sudo mv kubectl /usr/local/bin/

You can verify that kubectl is installed correctly by running the following command: kubectl help. Let’s move onto the last component minikube.

Installing minikube

So minikube is a simple tool that allows you to quickly deploy a single node Kubernetes cluster on your laptop/computer. We are going to be using that for demonstration purposes and to kick the tires on Kubernetes. You can install minikube by doing the following:

On MAC, you can run the following commands:

curl -Lo minikube https://storage.googleapis.com/minikube/releases/latest/minikube-darwin-amd64 && chmod +x minikube && sudo mv minikube /usr/local/bin/

minikube config set memory 4096
minikube config set cpus 2

On RHEL7, you can run the following commands:

curl -Lo minikube https://storage.googleapis.com/minikube/releases/latest/minikube-linux-amd64 && chmod +x minikube && sudo mv minikube /usr/local/bin/

minikube config set memory 4096
minikube config set cpus 2

RHEL7 NOTE: If you see the following error (I did not during my install, but it has been reported to happen sometimes):

Could not read CA certificate "/etc/docker/ca.pem": open /etc/docker/ca.pem: no such file or directory

The fix is to update /etc/sysconfig/docker to ensure that minikube’s environment changes are respected:

< DOCKER_CERT_PATH=/etc/docker
---
> if [ -z "${DOCKER_CERT_PATH}" ]; then
>   DOCKER_CERT_PATH=/etc/docker
> fi

You can verify that minikube is installed correctly by running the following command: minikube version. Pretty simple!

I want a Kubernetes!

So now that you have all the associated software installed on your laptop, let’s bring up a Kubernetes cluster!

On MAC and RHEL7, run the following command:

minikube start

To make sure you can access your Kubernetes cluster, run the following command:

kubectl get pods --all-namespaces

To stop and delete your cluster, run the following command:

minikube stop

Conclusion

Well, there it is! A simple way to get a Kubernetes cluster running on your laptop without requiring a public cloud account or a ton of hardware sitting in a lab or datacenter somewhere. This by far isn’t a magic bullet and it only good for running small light-weight applications. If anything, it’s a simple way to familiarize yourself with Kubernetes and general management of the cluster.

I plan on posting to my blog more often now… so stay tuned on some cool future blog posts! If you have any suggestions on topics you want to hear more on, please let me know! I am interested in everything from intro-101-type blogs to deep-dives. Just drop me a line!

Looking Back at EMC World 2016

Wow! How quickly a week can go by. Like many of you, EMC World 2016 was my first time in attendance and it also happen to be the first time I have been given the opportunity to be a presenter for a larger audience. I though the experience exceeded my expectations and based on some of the preliminary numbers and feedback that we have been getting on the sessions the EMC {code} team had presented, a good number of you agree the sessions content and presentations were of value to you. Thanks again for attending the sessions and providing your feedback.

Couldn’t make it this year?

For those that couldn’t make it out this year, a number of people in {code} have starting posting the materials and slide decks for our sessions. Official EMC World slide decks should be posted in the coming weeks, but there have been a large number of requests to get a hold of the material ASAP and many of us on the team have been happy to oblige. As for my sessions, you can find the materials below.

Introduction To Mesos & Mesosphere

Here is the session material for Introduction To Mesos & Mesosphere (Monday May 2 at 8:30) which just as the title says is a Apache Mesos 101 type session.

You can download the “Introduction To Mesos & Mesosphere” powerpoint presentation HERE. The video of the demonstration used at the end of the session highlighting Mesos using persistent external storage can be found on YouTube below:

The source code for the MVC Web Application written in Golang can be found in my GitHub repo. The two projects used in demo were RestServer and RestClient.

To launch the MVC Application with external persistent storage, you first need to have each of your Mesos Agent/Slave nodes running Mesos DNS and configured for persistent external storage using this Guide. Once you have those prerequisites in your Mesos Cluster, you can find the Marathon JSON files to launch tasks here. To start up the application, perform the following:

Start PostgreSQL:
curl -k -XPOST -d @postgres-mvc.json -H "Content-Type: application/json" YourMarathonIP:8080/v2/apps

Start RestServer:
curl -k -XPOST -d @restapi.json -H "Content-Type: application/json" YourMarathonIP:8080/v2/apps

Start RestClient:
curl -k -XPOST -d @ui.json -H "Content-Type: application/json" YourMarathonIP:8080/v2/apps

Deep Dive With Mesos & Persistent Storage For Applications

Here is the session material for Deep Dive With Mesos & Persistent Storage For Applications (Tuesday May 3 at 3:00) which covered the importance of Apache Mesos Frameworks and the powerful capabilities that 2 layer scheduling provides in your Datacenter and Mesos cluster.

You can download the “Deep Dive With Mesos & Persistent Storage For Applications” powerpoint presentation HERE. The video of the demonstration used at the end of the session highlighting the Elastic Search Mesos Framework using persistent external storage can be found on YouTube below:

To launch the Elastic Search Framework with external persistent storage, you first need to have at least a 3 Agent/Slave nodes in your Mesos cluster and each of your Mesos Agent/Slave nodes configured for persistent external storage using this Guide. To start the ElasticSearch scheduler, you can find the Marathon JSON files to launch task here. To start up the Scheduler, perform the following:

Start ElasticSearch Scheduler:
curl -k -XPOST -d @elasticsearch.json -H "Content-Type: application/json" YourMarathonIP:8080/v2/apps

If you want to run some of the advanced ElasticSearch functionality used in the demo, you can find additional information in this file here.

What’s Next…

After recharging for a bit, we have already started on our post-EMC World plans and deliverables. Hopefully this will bring a forth a bunch of interesting ideas and projects for the community. To keep up to date with the things that I will be working on, please follow me on Twitter at @dvonthenen. If anyone has any questions about the EMC World presentations, you can always catch me on the {code} Community Slack channel.

mesos-module-dvdi Installation Walkthrough

As other people in the EMC {code} team started getting involved with Apache Mesos, I have been helping by fielding questions and troubleshooting installations of both Mesos and mesos-module-dvdi so that others can kick the tires and become subject matter experts. It was brought to my attention that a good clean walkthrough of adding external volume/storage support to an existing production Mesos cluster might be of value to others which brings us to this blog post. We will cover a couple examples of launching Marathon tasks to make use of our new found capability. Also, we will take a look at functionality that the mesos-module-dvdi brings to the table and talk about what those features mean to you.

Preflight Checklist

Before we begin, I want to make sure that everyone who is going to follow along has a properly configured Mesos cluster and for those that don’t have a Mesos cluster, there is a very good walkthrough guide by DigitalOcean that I would highly recommend. I would encourage performing every step in this guide and not skip or take short cuts when deploying your cluster as it can lead to wonky behavior of your cluster.

Wonky Mesos Clusters

There are a number of open source projects out there that attempt to deploy a proper Mesos cluster, but each one that I have evaluated (there have been a lot) has always fallen short somewhere. – everpeace/vagrant-mesos currently only works for version 0.23.1 and older. There haven’t been updates to the project in some time. – mesosphere/playa-mesos runs on virtualbox, but I found a number of issues with how the nodes are configured and ran into issues using certain frameworks, such as the Elastic Search framework, because of virtualbox’s networking layer. The configuration that is deployed is only a single master node; so no high availability. This project also hasn’t been updated in some time. – minimesos project deploys a configuration that is backed by docker containers so if you need to modify something like the slave nodes (in our case, we need to) this isn’t going to be a good option. Like the previous method, single master and no high availability.

If you want kick the tires on all the functionality that Mesos has to offer, I would still recommend that you deploy these nodes by hand. If that is too time consuming or you don’t have access to AWS or hardware resources, playa-mesos gets you most of the way there. The {code} team has a fork of that project which has some bug fixes as well as some enhancements. You can find our fork on GitHub located at emccode/vagrant/playa-mesos and if you chose to go this route, the {code} fork of playa-mesos has mesos-module-dvdi already pre-configured using VirtualBox as the external storage provider in which case you can use this walkthough to verify your settings. Just a reminder, the purpose of this walkthrough is adding external persistent volumes for production Mesos environments in which you will most likely take the steps below and incorporate them into a DevOps tool that your organization uses.

mesos-module-dvdi Installation Walkthrough

mesos-module-dvdi builds on top of functionality that is provided by REX-Ray and DVDCLI. So the first thing we need to do is install both packages on all your Mesos slave/agent nodes (NOTE: that all steps outlined in this section needs to be done on all your slave/agent nodes as root). You can do that by running the following commands:

curl -sSL https://dl.bintray.com/emccode/rexray/install | sh -
curl -sSL https://dl.bintray.com/emccode/dvdcli/install | sh -

Then you need you configure REX-Ray with the storage provider you plan on using. Since I usually host my configurations on Amazon for demonstration purposes, I am going to configure REX-Ray to use EC2 and place the file at /etc/rexray/config.yml. This is what my configuration file looks like:

rexray:
  storageDrivers:
  - ec2
  volume:
    mount:
      preempt: true
    unmount:
      ignoreUsedCount: true
aws:
  accessKey: <YOUR_ACCESS_KEY>
  secretKey: <YOUR_SECRET_KEY>

You can do a simple test to make sure REX-Ray and DVDCLI are functioning properly by running the following command: rexray volume. If you need help on configuring REX-Ray for other storage platforms, you can view the REX-Ray configuration guide.

Next, we need to install the mesos-module-dvdi which gives us the ability to provision, mount, unmount external volumes to Mesos tasks. You can download the version that matches your Mesos configuration from our GitHub releases page. My Mesos cluster is running version 0.27.0, so I am going to download libmesos_dvdi_isolator-0.27.0.so and place the .so in the /usr/lib directory. We also need to create a Mesos isolator configuration file so that the Mesos slave/agent knows how to load the isolator module. Create the file /usr/lib/dvdi-mod.json with the following content inside (replace with your version of the downloaded isolator):

{
   "libraries": [
     {
       "file": "/usr/lib/libmesos_dvdi_isolator-0.27.0.so",
       "modules": [
         {
           "name": "com_emccode_mesos_DockerVolumeDriverIsolator",
           "parameters": [
            {
              "key": "isolator_command",
              "value": "/emc/dvdi_isolator"
            }
          ]
         }
       ]
     }
   ]
 }

Finally, we just need to add the hooks for the Mesos slave/agent to pick up the configuration file and load the isolator. You can do that by running the following shell commands:

echo "docker,mesos" | tee /etc/mesos-slave/containerizers
echo "com_emccode_mesos_DockerVolumeDriverIsolator" | tee /etc/mesos-slave/isolation
echo "file:///usr/lib/dvdi-mod.json" | tee /etc/mesos-slave/modules
service mesos-slave restart

Success! This configuration will also allow you to run external volumes for docker workloads which is why you see docker in the first command. To learn more about using external storage with the docker containerizer in Apache Mesos, please checkout this great article on the EMC {code} blog.

Very Nice Great Success

Exercising the mesos-module-dvdi

Now that we have all this configured correctly, lets start out by creating a couple of external volumes by launching a Mesos task. Create a file called basic.json with the following content inside:

{
  "id": "hello-mesos",
  "cmd": "while [ true ] ; do touch /var/lib/rexray/volumes/firstvolume/hello1 ; sleep 5 ; done",
  "mem": 16,
  "cpus": 0.1,
  "instances": 1,
  "env": {
    "DVDI_VOLUME_NAME": "firstvolume",
    "DVDI_VOLUME_OPTS": "size=5,iops=150,volumetype=io1,newfstype=xfs,overwritefs=false",
    "DVDI_VOLUME_DRIVER": "rexray",
    "DVDI_VOLUME_NAME1": "secondvolume",
    "DVDI_VOLUME_DRIVER1": "rexray",
    "DVDI_VOLUME_OPTS1": "size=6,volumetype=gp2,newfstype=ext4,overwritefs=false"
  }
}

Then we can launch the Marathon task by running the following shell command:

curl -k -XPOST -d @basic.json -H "Content-Type: application/json" :8080/v2/apps

This simply creates two new volumes called “firstvolume” and “secondvolume” and uses the default REX-Ray mount location /var/librexray/volumes to mount these volumes.

For a more complex example, lets stand up a simple web server with an external volume and scribble some data on it. Create a file called web.json with the following content inside and replace YOUR_NAME_HERE with your first name (be careful and try not to remove the single quote trailing it):

{
  "id": "webserver",
  "uris": [
    "https://github.com/dvonthenen/goprojects/raw/master/bin/statichttpserver"
  ],
  "cmd": "echo 'Hello, YOUR_NAME_HERE' $(cat /var/lib/rexray/volumes/webdata/readme.txt | wc -l) >> /var/lib/rexray/volumes/webdata/readme.txt && chmod u+x statichttpserver &&  ./statichttpserver -port=$PORT -path=/var/lib/rexray/volumes/webdata",
  "mem": 16,
  "cpus": 0.1,
  "instances": 1,
  "constraints": [
    ["hostname", "UNIQUE"]
  ],
  "env": {
    "DVDI_VOLUME_NAME": "webdata",
    "DVDI_VOLUME_OPTS": "size=5,iops=150,volumetype=io1,newfstype=xfs,overwritefs=false",
    "DVDI_VOLUME_DRIVER": "rexray"
  }
}

Then we can launch the Marathon task by running the following shell command:

curl -k -XPOST -d @web.json -H "Content-Type: application/json" :8080/v2/apps

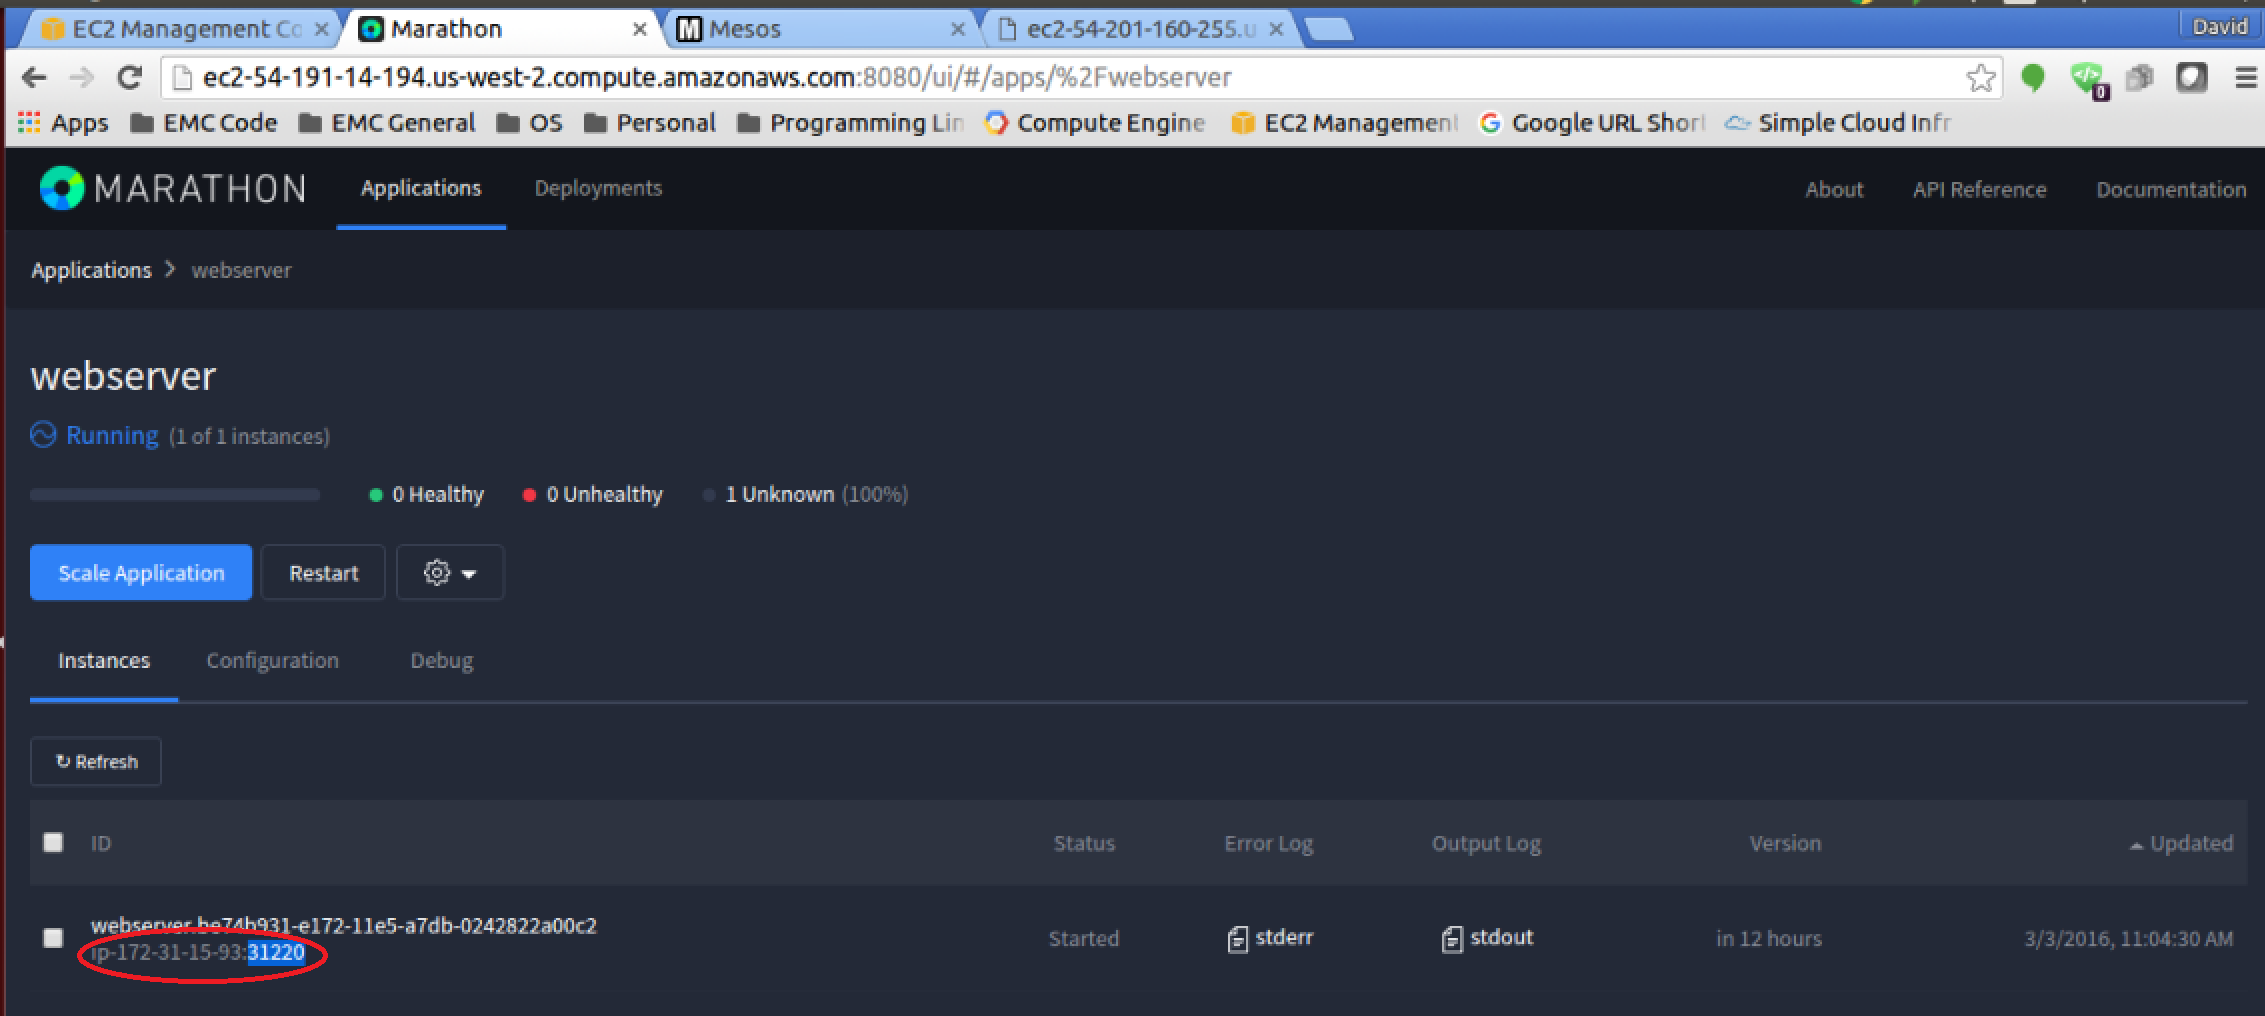
You can find out what slave/agent node and port the web server is running on by clicking on the running task in the Marathon UI and looking at the application configuration information on the page (as seen below).

Marathon Task

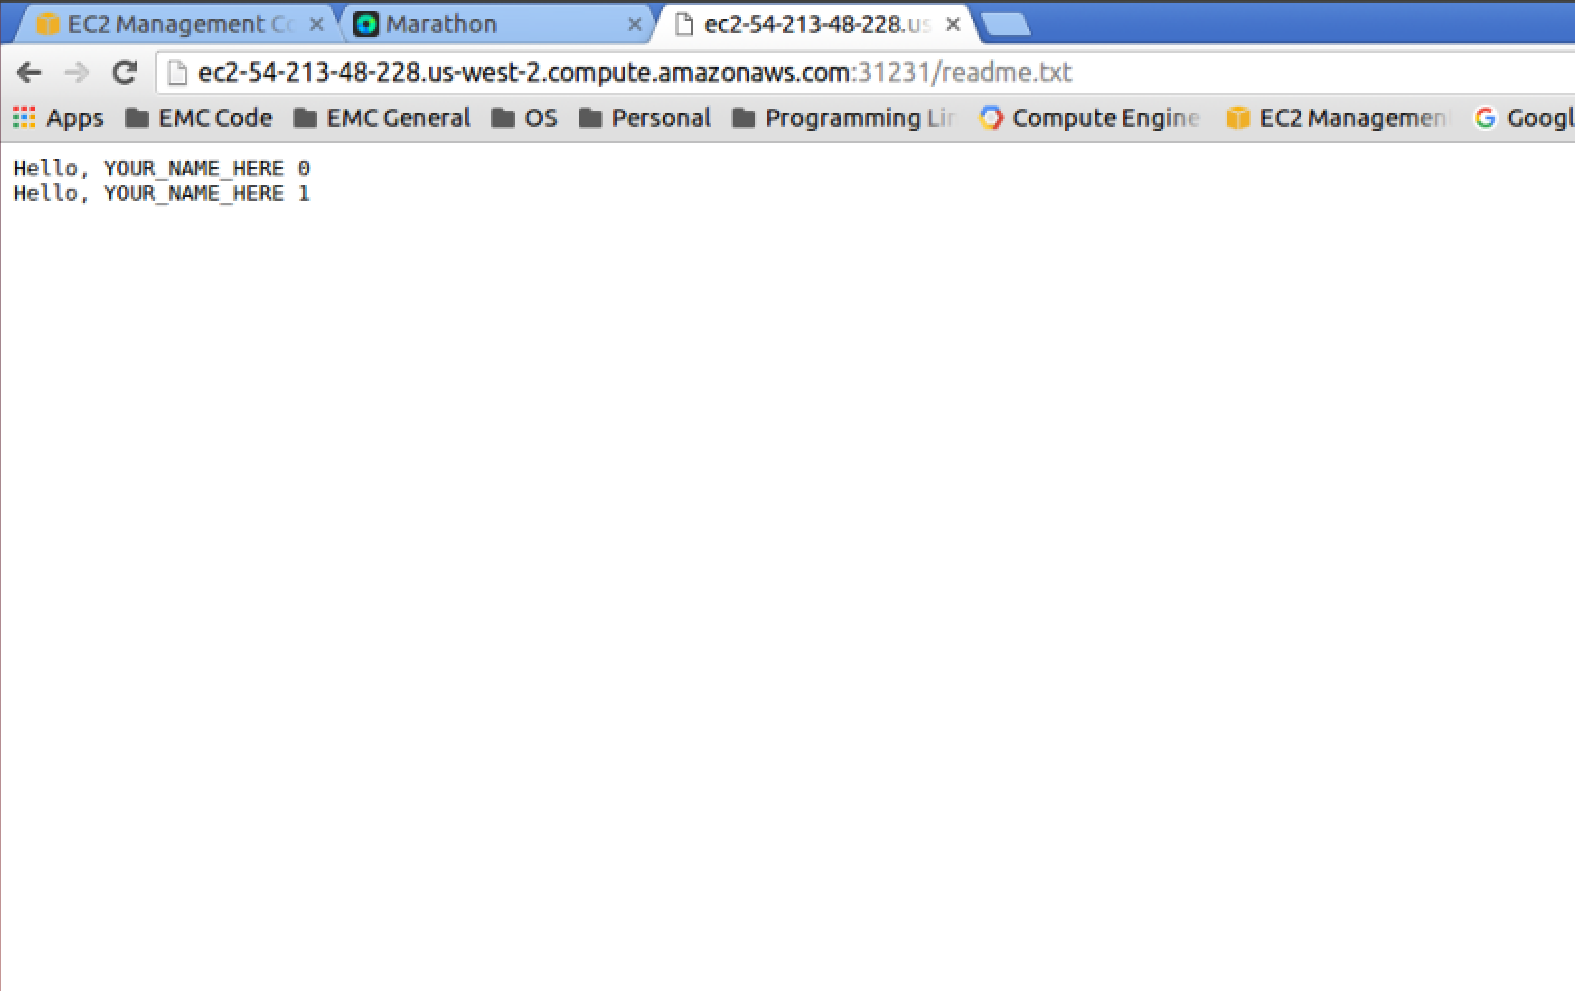
And if you open up that hostname and port in your web browser (you may have noticed that my FQDN name isn’t the same since I configured my EC2 instances without elastic IPs), you will have accessed the webserver we downloaded from my GitHub account and you should see a file readme.txt at the root. When you click that readme.txt to display the contents, you should see your name inside the text file.

Opening up the readme.txt

Although the second example is a fairly meaningful real world example of using external volumes/storage, the real benefits don’t become apparent until you start doing things like failing the Mesos slave/agent node that is currently running the task. We can simulate this failure, by simply stopping the Marathon task and relaunching it. The new instance of our task may start up on a different node, but the important take away is that the external volume from the first instance will be reattached to the new task thus preserving any prior data. If you open the readme.txt after the task enters the running state, you should see the previous “Hello” line with a “0” at end now followed by a “Hello” line ending in “1” that this new instance has added on. Now just imagine a database like PostgreSQL or an Elastic Search node as a Marathon task. Any failure in the Mesos slave/agent or health check will trigger the task to start up from its previous state on a new node. Say “Hello” to high availability!

Persistence!

What’s Next…

Very cool! Hopefully this served as a good guide to adding external volume/storage support to your existing Apache Mesos cluster using REX-Ray, DVDCLI, and mesos-module-dvdi. I have a couple of ideas on some follow up blog posts… thinking about how I do dev/test for mesos-module-dvdi with Docker containers or perhaps more about frameworks. If you have any topics you might want me to discuss, please drop me a line on twitter at @dvonthenen.